
It depends how long it takes you to do what ever you’re trying to do.
There. That’s the end of the article.
Just kidding.
A Terminology Tangent
First, you’re probably thinking, “Tangent? This guy hasn’t even started writing anything yet“.
Second, I probably should apologize for having two products, that look nearly identical, that have nearly the same name, targeted at different applications, and with wildly different price tags. I am trying to take the Ron Swanson approach to making products. I’d like to just call things what they are. No marketing, no flair, no sponsored product placements. So, anyway, let me take a second and remind you, my loyal readership, what these acronyms stand for:
INS stands for Inertial Navigation System. This is an industry term in robotics that, generally speaking, defines a system that is a GNSS receiver, accelerometer, gyroscope, barometer, and temperature sensor (among other sensors, sometimes) combined together with a complex sensor fusion algorithm to produce a single high-rate, high-accuracy 6DOF pose (and corresponding derivatives that we will talk about later in this post).
sidenote_1: 6DOF Pose stands for 6 Degree Of Freedom Pose. These 6 individual degrees of freedom are: Roll, Pitch, Yaw, X Position, Y Position, Z Position. When combined, they represent the position of the sensor in a 3D world.
IMU stands for Inertial Measurement Unit. This term is a bit more complicated. This is also an industry term (in robotics, and motorsport at the sub-pro level) that, generally speaking, defines way way too many different sensors, systems, and products.
In motorsport, an IMU is generally defined as a sensor that will give you acceleration, and angular velocity. It is generally a very basic raw sensor output with no sensor fusion or on-board math going on.
In robotics, an IMU is generally defined as an accelerometer, gyroscope, barometer, and temperature sensor combined together with a complex sensor fusion algorithm to produce high-rate / high-accuracy orientation (roll, pitch, yaw), acceleration, and angular velocity.
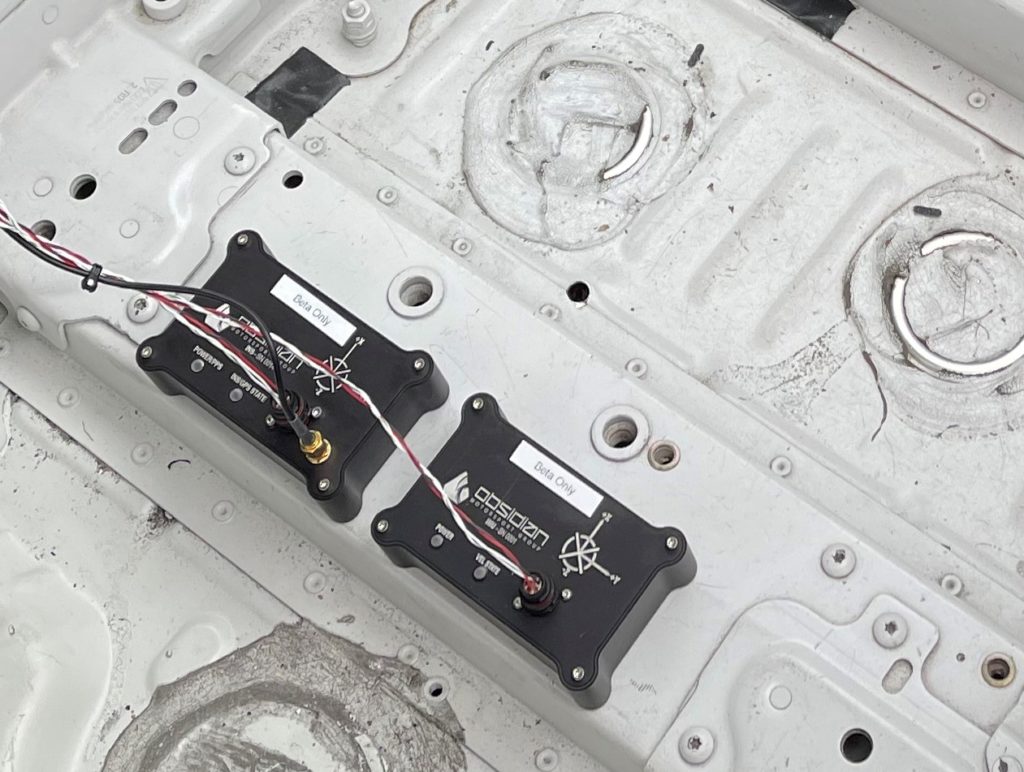

So, as you can probably tell at this point, I’m following the terminology of the robotics world in naming these two products. The robotics definition of the INS is what the Obsidian Motorsport Group INS is. The same is true for the Obsidian Motorsport Group IMU.
Derivatives and Antiderivatives
I know, scary math word, but please relax. I’m going to do everything in my power to use intuitive examples to demonstrate some things about how the IMU (and to some extent, at a very basic level, the INS) derive some of their more interesting data products.
Derivatives are simply the representation of the change of something divided by the time it took to make that change. Antiderivatives (also referred to as Integration) are the opposite. Stay with me here, practical examples that are not your run of the mill “passenger on a train” physics examples are incoming…
Lets assume that you have a general purpose 3-axis accelerometer mounted in a vehicle, rigidly attached to the chassis, and the X-axis is pointed forward, the Y-axis is pointed left, and the Z-axis is pointed up.
sidenote_02: This accelerometer mounting mentioned above (and our INS / IMU…) follows a “Right-Hand Rule” convention. If you curl your right hand in to a fist and rotate it such that your thumb is up, and do the following:
- Point your pointer finger forward
- Point your middle finger toward the left
- Point your thumb in the air
Your pointer finger will be the X-axis, your middle finger will be the Y-axis, and your thumb will be the Z-axis. No matter how you mount a “Right-Hand Rule” IMU, if you keep the finger-to-axis assignments the same, you’ll be able to envision what the coordinate frame looks like with your hand! Neat.
Using the coordinate reference frame mentioned above, when the vehicle travels forward, there will be positive acceleration present in the X-axis.
- If you integrate the acceleration (using units of m/s/s) in the X-axis, you will get velocity (using units m/s) in the X-axis.
- If you integrate the velocity (using units of m/s) in the X-axis, you will get position (using units of m) in the X-axis.
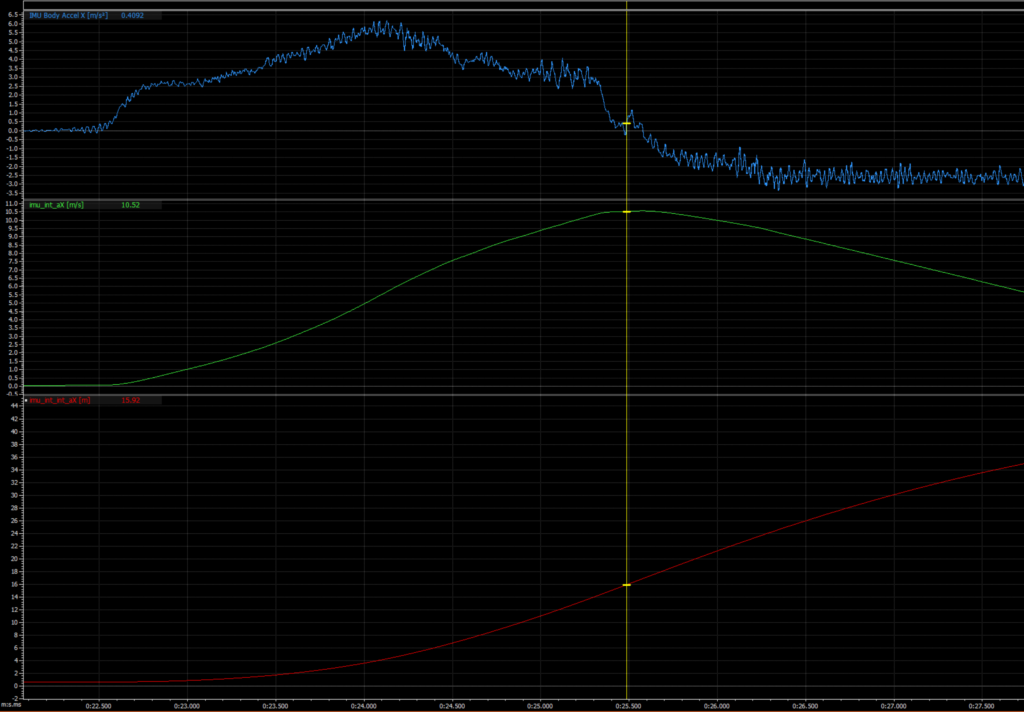
The picture below should illustrate that point well.
- The blue trace at the top is a measure of longitudinal acceleration (forward + / backward – ) in units of m/s/s.
- The green trace is a measure of longitudinal velocity in units of m/s. This is a result of integration of the blue trace.
- The red trace is a measure of longitudinal position in units of m. This is a result of integration of the green trace.
sidenote_04: It’s important to remember that there are a lot of factors that go in to creating an accurate acceleration measurement to do these integrations off of. You should absolutely try this on your own with whatever sensor you want to use, but be warned, It’s harder than you think to do this with a basic accelerometer.
So, now you know the relationship of acceleration, velocity, and position. I feel pretty strongly that this is an important concept to grasp to discuss the next part of this post…
Error
Now that we know how integration works, intuitively anyway, we can talk about the biggest issue with integration: error.
Accelerometers are not perfect instruments. Even the fanciest ones on the planet are prone to small error based on a multitude of factors (Namely temperature for the ones that normal civilians have access to). When we integrate acceleration to get velocity, any small error in acceleration, will propagate forward as an error in velocity. This is compounded when we integrate velocity to get position!
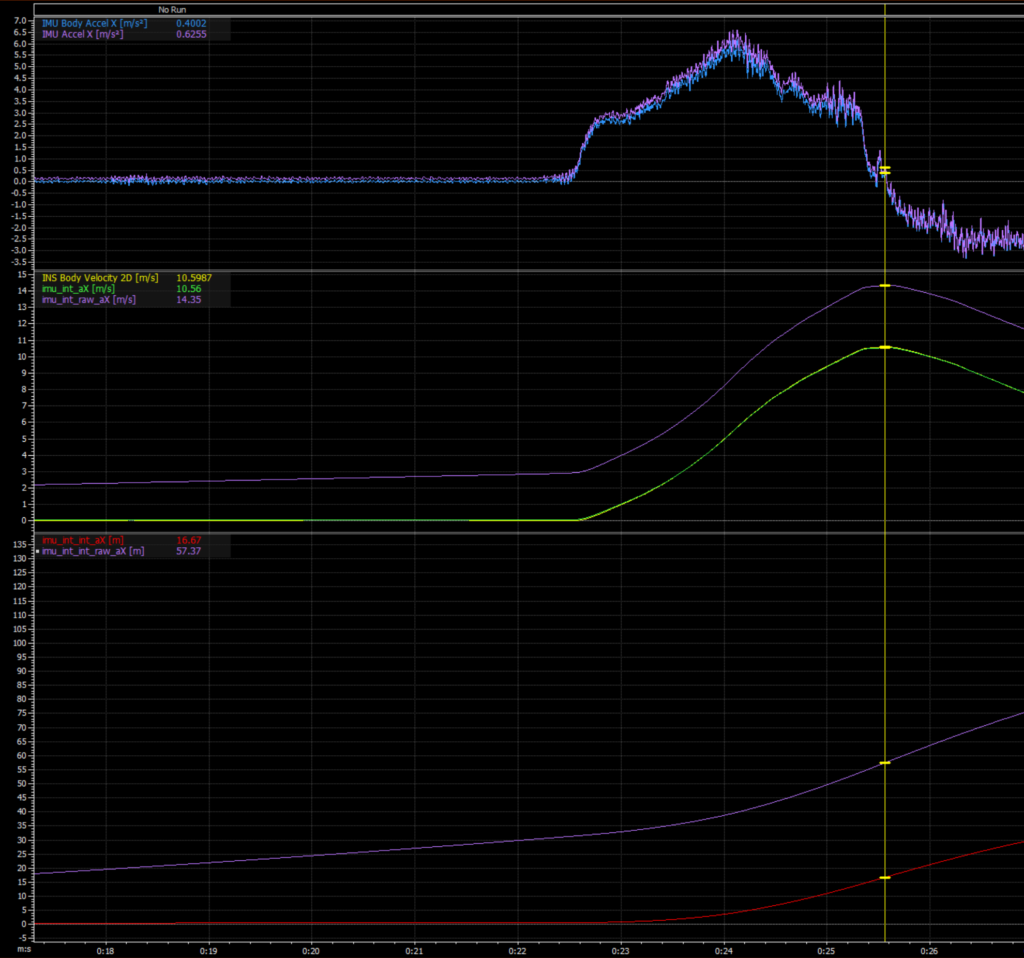
The picture below, should illustrate that point well. It is the same data as the trace above, but with some error introduced in the longitudinal acceleration measurement. Check out the position error at the end, it’s ~40m !
- The purple trace at the top is “nearly” the same acceleration as the IMU Body Accel X [m/s/s] channel.
- The purple trace in the middle is a result of integration of the purple acceleration measurement at the top. Notice the significant error (~4 m/s).
- The purple trace at the bottom is a result of integration of the purple velocity trace in the middle. Notice the massive error (~40m).
Our IMU goes through a factory calibration at the chip level, then a second calibration (at our office) to try to do our best to remove any errors that are introduced after installation (soldering). We spend a lot of time with this to try to give you acceleration data that is in blue, and not in purple.
In addition to our calibration processes, there are online algorithms that are running that are constantly (on the sensor itself) trying to estimate and correct any errors in the acceleration and gyroscope measurements to make sure that we’re providing you the best data possible. However, since those algorithms have no real understanding about how the vehicle is moving through the world (say, with a GNSS / GPS receiver like the INS…), these bias correction algorithms are only effective to a point. This “point” is about 30-45 seconds after the vehicle has left the starting line and the integration process has begun.
Do I need an INS or can I use an IMU? TELL ME, SANDER.
Okay, okay. I hear you.
The IMU is explicitly designed for standing start, ground vehicle, racing that lasts for less than 30-45 seconds.
The INS is explicitly designed for everything. Since the sensor has a GNSS / GPS receiver on board, the sensor can automatically mitigate biases that creep in over time to the accelerometer and gyroscope. It has no time bound.
The IMU will provide the following data products at up to 800hz:
- Ground Speed*
- Raw Acceleration (X, Y, Z)
- Body Frame Acceleration (X, Y, Z)
- Angular Velocity (X, Y, Z)
- Orientation (Roll, Pitch, Yaw)
*The IMU will need to be sent a simple CAN message to tell it that the pass has started to generate Ground Speed. It’s easy to do, I promise.
The IMU will have the following features:
- Adjustable baud rate (1mbps default, 500kbps, 250kbps)
- Adjustable transmission rate (800hz, 400hz, 200hz, 100hz, 50hz, 25hz, 10hz).
- Adjustable user tunable filters for acceleration / gyroscope data
- Advanced Kalman filter tuning parameters
The sensor will be sold for $1750 and I will have a number in hand to sell in about 3-4 weeks. As always, if you have any questions, please email me at sander 4T obsidianeng d0t com
Now, you may be thinking, “Sander, you could have lead with that and I wouldn’t have had to read this stuff about derivatives, integration, and error propagation.”
You’re right. I could have.